Pages

Sunday, December 28, 2014

Adding a feed to WeaRSS

In this post I'll go over the process of adding a feed to WeaRSS. I promised this in an earlier post, but I wanted to wait until I was able to push the latest app update that is available now. Adding a feed is easier than ever!

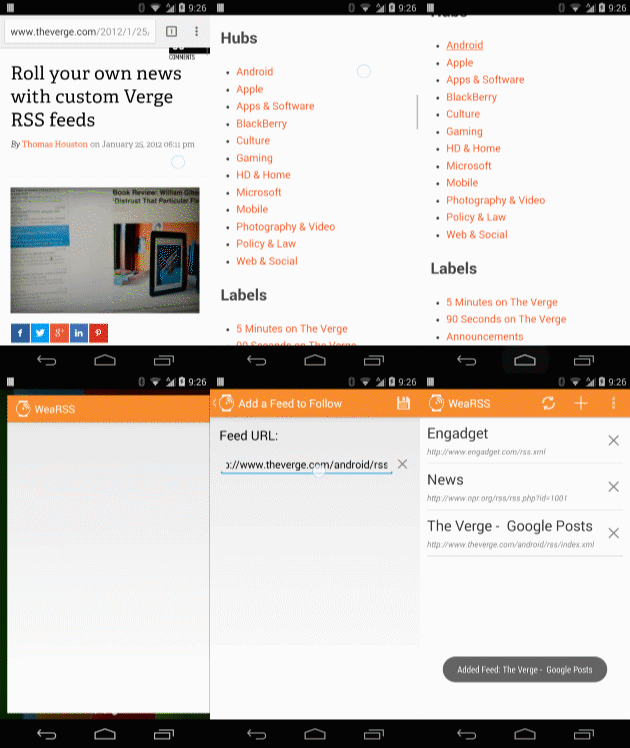
For a quick overview of the process, I've created an animation that shows you what to do:


Read on for a detailed description of the process.

Your Source


First, you'll need an online source that you want to follow. This will likely be any website that has somewhat regularly updated content. For the purposes of this overview, we'll be using The Verge.

Find Your Feed


Next you'll need to find your site's RSS feed or feeds. Unfortunately there is no one way that sites make their RSS feeds available. A very common way to let users know about feeds is to have a "RSS" or "Subscribe" link somewhere on the periphery of the page - perhaps in a sidebar or in the footer of the page. Another indication is to look for the universal RSS icon:

The Universal RSS Icon
On The Verge's site, I found a "Subscribe" link down in the footer of their home page. However, as is common with many sites, The Verge actually has another set of feeds availablex. I found this post going over a way to "roll your own" RSS feed based on a variety of criteria. I'm going to use the "Android" feed.

Copy & Add - That's It!


Once you've found the feed link you want to follow, all you need to do is long-press on the link to bring up the Android context menu. Select the "Copy link address" option to copy the link to the device clipboard.

Finally, open WeaRSS and tap the "+" icon to open the Add Feed screen. The screen will open and the link you copied will already be in the the URL field. All you have to do is tap the save icon and your feed will be added.

Happy Reading!


Sunday, November 9, 2014

Introducing WeaRSS!

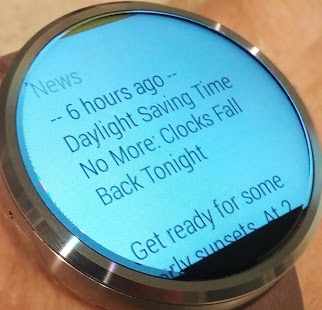
I'm excited to announce my latest Android app called WeaRSS - it's an Android Wear app that allows you to keep up with the latest news headlines right on your Android Wear device!
I wish this was the news every day.
I made the app because I thought it would be convenient to quickly glance through news headlines on a Wear device; there are times when it might not be convenient or possible to pull out your phone but you still want to stay in the loop. Also, you don't always need access to the full story; getting a glanceable version of the story is just right.

Getting Going


With WeaRSS you get news updates by following RSS feeds. In case you're not fully up on the nerd lingo, RSS feeds are a standardized to share up-to-date web content. You can find a pretty good explanation here. Most websites with regular updates have one or more RSS feed - just poke around on the home page and you'll likely find an "RSS" link.

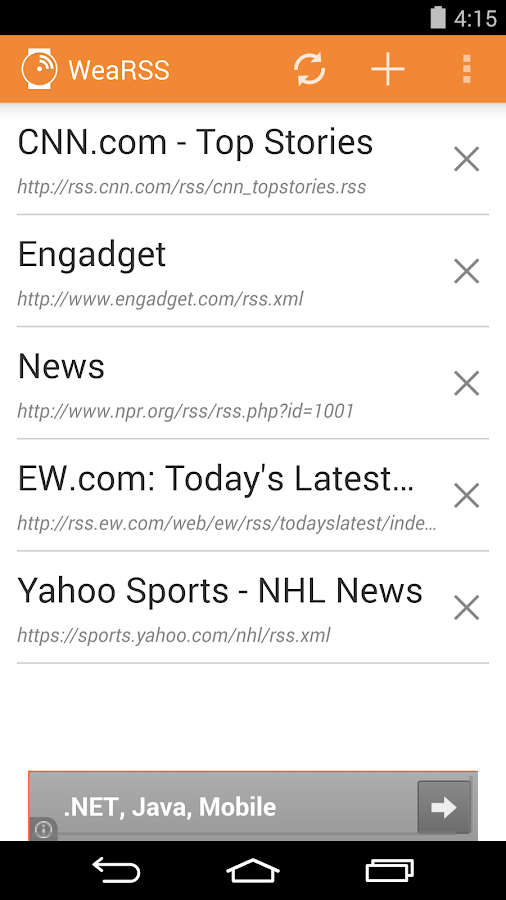
To get things going you just type or paste in RSS urls from your favorite websites to build a list of feeds to follow. In a future blog post I'll go over the process for getting RSS feeds into the app. Add as many feeds as you want! Once you have your feeds, WeaRSS will start pushing news headlines to you at regular intervals.
Following some feeds - add your own!
For this first release there are a couple of customization options:
  • Setup how frequently the headlines are fetched and synced to your wearable.
  • Set how many headlines from each feed will be sent with each update.

Voice Control


You don't have to wait for the sync operation to read through the headlines on your wear device. You can open the app using voice control - just say "OK google, start app my headlines." The app will open showing you the headlines that were most recently synced. You can also hit the refresh button on the companion mobile app to get the latest and greatest.

I've got a lot of ideas about where to take the app in future releases, but I want to find out what other people want. Leave a comment or send me an email and let me know what you'd like to see in the app.

I hope you find the app useful and it makes your Android Wear device just a little bit better!

Get it on Google Play

Wednesday, September 25, 2013

Maven Central's 'artifactid' is build.gradle's 'name' property

Recently I wanted to utilize a third party library in one of my Android applications. The library is available via Maven Central, and since I'm now using Android Studio for development I thought I'd use gradle to auto-import the library. I knew this was possible and relatively straightforward, but I ran into something that threw me for a loop and that I couldn't find documented officially anywhere. I figured I'd share what I found to hopefully save someone else the potential hassle.

At the bottom of each Android app's build.gradle file is the section where you reference third party libraries that will automatically come from Maven Central. For most Android apps the support library is included:
dependencies {
    compile 'com.android.support:support-v4:18.0.0'
    //This is where references to the third party libs go
}
To get a library to work in gradle from Maven, it needs 3 pieces of information. For every library, Maven central provides 3 primary pieces of information. Respectively, the fields for each are:
//Gradle Info:
group: 'com.example.library'  //The package name for the library
name: 'someuniquename'        //An identifier for the lib
version: 'X.Y.Z'              //lib version number

//Maven Info:
groupId: 'com.example.library'  //The package name for the library
artifactId: 'someuniquename'    //An identifier for the lib
version: 'X.Y.Z'
It seemed pretty obvious that "group" and "groupId" would line up in both places. But here was my gotcha point: when referencing the maven library, the "artifactId" value from Maven is what you use for gradle's "name" property.

Like I said, I couldn't find this documented anywhere. On a different project previously I attempted to bring in a Maven library and it didn't go so well. It could have been due to a buggier, earlier version of Android Studio, but not knowing this bit of info certainly didn't help.

When you bring it all together, this is what the build.gradle file will look like:
dependencies {
    compile 'com.android.support:support-v4:18.0.0'
    compile group: 'com.example.library', name: 'someuniquename', version: 'X.Y.Z'
}

Saturday, May 18, 2013

Quick Tip: Set socket.io log level in zappajs

I've been working on a zappajs based website that has a socket.io connection to the browser. By default socket.io likes to output a lot of debug text. I got tired of seeing it all and wanted to turn it off. Thankfully, it's easy.

At the top level of your zappajs instance definition, right alongside where you define your @use statements, define routes/templates, and so on, you can call into the @io object, which is a reference into the socket.io server-side instance. You just put:

@io.set 'log level', 1

-- or if you like closer to "regular" javascript syntax you can do: --

@io.set('log level', 1)

Log level 1 is the least chatty of them all. You can see the different levels to choose the one you want here.

Friday, March 8, 2013

"do" stuff in Coffeescript

I can't deny that I have an attraction to coffeescript. I can't even fully explain it. I think it might be the super-tight syntax, ability to not have to depend on parenthesis or curly brackets, and zippy server-side templating engines like CoffeeKup or Eco. Of course there are pros and cons to coffeescript (I'll abbreviate to CS), and I definitely don't use it in all cases. The point of this post isn't to love or hate on CS; I'll leave that to others more qualified than myself.

As I've been learning CS there are a couple of things I normally do in javascript that I couldn't quite figure out how to do:
  • The right way to call a function with no arguments
  • Immediately execute anonymous functionality, like in a switch statement
It turns out that they both hinge on using the same keyword: "do."

No-Argument Functions
CS is very sparse in its use of parenthesis; calling functions with arguments makes clear sense, but it's not immediately clear how functions without arguments get called. Check out the two lines of code:

The second line of code seems logical, but we can't forget this is still javascript. The processData function is an object after all, so that line of code merely assigns processData to returnData. Adding parenthesis works - that is, processData() - but I figured there was a more "coffeescript-y" way to do it. Enter "do:"

There is the CS way to do things! Calls the function perfectly. "do" Helps us elsewhere too:

Immediately Call Anonymous Functionality:
In a similar fashion, there are times when an anonymous function is immediately called, as opposed to in a callback fashion. I'll just show the code:

Again, "do" is the secret weapon here. When supplying callback function to CS, you can just specify inline without "do." But in the case of the switch statement it needs to called immediately, hence the keyword.

Those are the two cases that I was able to find, but perhaps there are more ways "do" is used in CS. Did I miss anything?

Tuesday, January 15, 2013

How to: Receive NFC data in an Adobe AIR Android app

Getting NFC data into an Adobe AIR for Android application is much easier than it might seem. At least, it's a lot easier than I thought it would be.

I'm currently working on an app that has just such a need. Specifically, users will run the AIR app and then swipe their device over a physical display that has some NFC tag hotspots. The app needs to receive the NFC data from each tag and react in a specific fashion. I didn't know much about NFC data when I began working on this current app, and since AIR doesn't have official support for NFC I figured I would need a native extension to properly handle things.

It turns out it is *much* simpler than needing to implement any sort of native functionality. All you have to do is add the proper intent handling to the "manifestAdditions" portion of the AIR application xml. I'll put a sample xml block here, and then explain it:


The key to making everything work is in effect "extending" the <application> node - which prior to discovering this I didn't know was possible. By adding the appropriate NFC intent filter information - the "default" way you handle NFC data in Android - the AIR application is handed the day the same way any other Android application would be.

In the xml sample above, I have  my AIR app responding to a URI. I've got placeholders for the scheme and host attribute values. Most commonly these will represent a web URL; in that case scheme would be "http" and host would be the domain - "yourdomain.com". But if you want to use proprietary data, you can do that too. Scheme and host can be anything. Scheme could be "my" and host could be "uri.value" which would represent "my://uri.value." It doesn't really matter, the data will make it to the AIR app. This is just one way of targeting NFC data into an app - there are a number of different ways to use intent filters in Android to target varied NFC data types. Virtually all of them should work as manifest extensions for an AIR app. The Android documentation has information about targeting NFC data here.

Extending the manifest only gets us so far; it doesn't tell us how the data gets into the AIR application. Thankfully, Adobe has facilitated that too. Anytime the app responds to intent filter data, an InvokeEvent.INVOKE event gets fired. Check out the below class:

To be clear, the invoke event will in fact be fired when the app starts up, but will *also* be fired whenever the NFC intent data qualifies and is passed to the app. This means that the app will be handed any and all relevant NFC data and can respond by reading the events.arguments data.

This also has the added effect of launching your AIR application whenever the relevant NFC data is swiped. That's actually what Android generally means to have happen with NFC data - the user swipes their device and the relevant specific application is opened. This will in fact do that. But as this post discusses, it will also pass in the NFC data while the application is running.

If you aren't wanting the app to be launched on NFC data but instead *only* respond to the NFC data while the application is open, that requires more complexity. It does, in fact require a native extension interacting with something called the "Foreground Dispatch". A very intelligent person has actually cracked the code and has made, well, the source code available for free! You can see it here:

http://code.google.com/p/ane-lab/source/browse/#svn%2Ftrunk%2Fmobile%2Fandroid%2Fjava%2Fnfc-foreground-dispatch

I hope this helps!
Monday, December 10, 2012

Boxresizer FTW!

You may have noticed that I recently added a set of social icons to the sidebar of the ol' blog here. Don't they just look pretty there in the page? Yeah, I thought so too.

I created the icons at a resolution of 128px by 128px, just to have some extra image to work with; I figured I may end up using the icons in varied contexts. I also knew I'd be scaling-down the icons when I embedded them in the blog page layout.

I assumed that these days pretty much all modern browsers take care of smoothing out scaled images just fine, but turns out I was wrong. It's better than it used to be, but it still doesn't compare to a resample that you'd expect. I embedded the images in the page, manually setting their dimensions, and I was seeing enough jaggies to bug me.

I didn't want to have to create new, resized versions of the icons every place I used them, so I started looking for a website that would do real-time, url-based image scaling. I knew there were sites/services like that out there, but when I started my hunt they were actually harder to find than I expected.

Thankfully, I eventually stumbled upon Boxresizer. It was exactly what I was looking for: you call a particular URL including your source image, resulting size, and boom, they output a nice, smoothly scaled version of the image!
Boxresizer makes Octocat happy...
...because it makes him super sneaky small ninja Octocat!

If you want to see sample URLs of how Boxresizer works, just hit up their site or copy the image location of Octocat here or the other images in the sidebar. Both Firefox and Chrome have an option to copy the URL when you right-click on an image.

PROTIP: Don't forget, though, that when you're passing your image URLs to the Boxresizer URL, it needs to be URL encoded. You can't just pass the image path as is. Thankfully, there are tons of online tools to URL encode a string, like this one.